Data Engineering Development Environment using WSL and Miniconda
Recently I managed to get the Windows Subsystem for Linux configured on my Windows 10 workstation. So, the logical next step was to use it by getting the PySpark installed, configured, and running there. However, instead of running dozens of pip install and manual post-configuration of all those packages, I decided to rely on the packaging functionality of Miniconda. Eventually, it saved me plenty of time.
Why I use Miniconda?
Miniconda is an open-source package and environment management system. It not just installs, runs, and updates packages and their dependencies, but also it easily creates, saves, loads, and switches between environments on your workstation. As the package manager, it became popular among data engineers/scientists. Some you perhaps will ask, why I did not just use pipenv or virtualenv?
This is what a popular thread on stack overflow states:
Having been involved in the python world for so long, we are all aware of pip, easy_install, and virtualenv, but these tools did not meet all of our specific requirements. The main problem is that they are focused around Python, neglecting non-Python library dependencies, such as HDF5, MKL, LLVM, etc., which do not have a setup.py in their source code and also do not install files into Python’s site-packages directory.
StackOverflow – What is the difference between pip and conda?
There are few more reasons for using WSL and Conda:
- I like to have a clean workstation. I will just shut down WSL when I do not need to work with PySpark.
- The common modern DE packages, like Apache Spark, Airflow, Pandas feel Linux like home. They often ported to Windows, but sometimes with limited functionality and stability.
- When I do not need the environment, I need just to run
conda env remove -n ENV_NAME. This will clean custom packages installed there, environment variables, and clean all dependencies. - Visual Studio Code can work use conda environments that run in WSL the same way as it uses local python installations
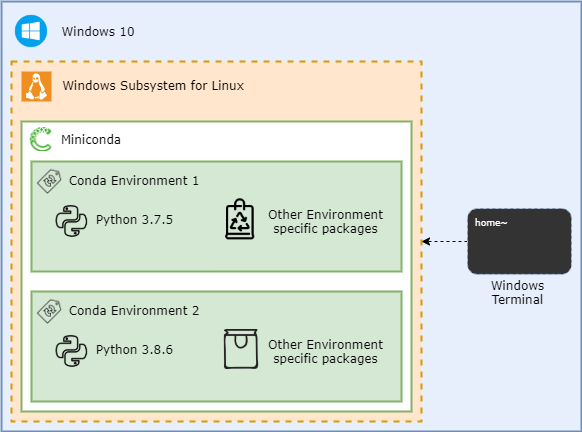
Logically, the configuration looks like a set of nested containers. Each can be re-created, re-installed, so this gives some level of abstraction, and makes my life, as Data Engineer, slightly easier:
Getting Miniconda installed and configured
Step 1 – Making WSL distro ready
First things first, let’s upgrade all installed packages in Ubuntu to the latest version:
sudo apt update && sudo apt upgrade -y
The execution time of the upgrade can take a while. Eventually, it end-ups into something like this:
Reading package lists... Done
Building dependency tree
Reading state information... Done
All packages are up to date.
Reading package lists... Done
Building dependency tree
Reading state information... Done
Calculating upgrade... Done
0 upgraded, 0 newly installed, 0 to remove and 0 not upgraded.
The next (important) step is to install java. This package is needed due to the nature of Spark since it was built using Scala and uses JVM. The error message JAVA_HOME is not set is a symptom that java package is not installed yet.
# Installation the package
sudo apt install openjdk-8-jdk -y

# Adding a system-wide environment variable by adjusting system file
echo 'JAVA_HOME="/usr/lib/jvm/java-8-openjdk-amd64"' | sudo tee -a /etc/environment

# Applying the changes
source /etc/environment
Let’s check the installation:
cat /etc/environment | grep JAVA

# it should return:
# JAVA_HOME="/usr/lib/jvm/java-8-openjdk-amd64"

java -version
# It should results into something like:
# openjdk version "1.8.0_282"
# OpenJDK Runtime Environment (build 1.8.0_282-8u282-b08-0ubuntu1~20.04-b08)
# OpenJDK 64-Bit Server VM (build 25.282-b08, mixed mode)
Step 2 – Installing Miniconda
Firstly, the installer script to be downloaded and executable permissions granted:
# Download miniconda to the home directory
cd ~
wget https://repo.anaconda.com/miniconda/Miniconda3-latest-Linux-x86_64.sh

# And then mark script as executable one
chmod +x Miniconda3-latest-Linux-x86_64.sh
The installer script to be started and during the configuration process following steps to be performed:
- Review and accept the license
- Accept the default installation location (or change it)
- Agree on automatic activation of the conda, later it can be disabled by running
conda config --set auto_activate_base false
./Miniconda3-latest-Linux-x86_64.sh
When conda is installed, it worth to add an extra distribution channel conda-forge and set it as the one:
""" Setup channel"""
conda config --add channels conda-forge
conda config --set channel_priority strict
Conda-forge is a community-based initiative and often contains packages that not available in the default channel.
Another useful package is needed for autocompletion of conda commands, conda environments, and so on:
conda install conda-bash-completion
The final step is to remove the installer script to release some disk space:
rm Miniconda3-latest-Linux-x86_64.sh
Step 3 – Create environments in conda
The following snippet will install two environments, with a different version of the requested packages:
conda create -n pyspark2 -y python=3.7 pyspark=2.4
conda create -n pyspark3 -y python=3.9 pyspark=3.1.1
When the installation is done, let’s check the list environments:
conda env list
At this stage it should return three items:
# conda environments:
#
base                  *  /home/avolok/miniconda3
pyspark2                 /home/avolok/miniconda3/envs/pyspark2
pyspark3                 /home/avolok/miniconda3/envs/pyspark3
Step 4 – Testing conda environments
Let’s test the first environment by running the spark and checking the software version of the packages
conda activate pyspark2
pyspark
Please notice that the used packages are: PySpark = 2.4.6 and Python = 3.7.10
Welcome to
      ____              __
     / __/__  ___ _____/ /__
    _\ \/ _ \/ _ `/ __/  '_/
   /__ / .__/\_,_/_/ /_/\_\   version 2.4.6
      /_/

Using Python version 3.7.10 (default, Feb 19 2021 16:07:37)
SparkSession available as 'spark'.
>>>
Let’s now use a spark context to run a transformation ( createDataFrame() ) and action ( show() ) commands to render the dummy data frame:
spark.createDataFrame([("Alex", 37), ("Ivan", 9)], ["first_name", "age"]).show()

# and the output is:

+----------+---+
|first_name|age|
+----------+---+
|      Alex| 37|
|      Ivan|  9|
+----------+---+
After testing the first environment we can now exit the spark-shell by typing exit() and then activate another one – pyspark3:
conda activate pyspark3
pyspark
This time the software versions of the Python and Spark packages are different:
Welcome to
      ____              __
     / __/__  ___ _____/ /__
    _\ \/ _ \/ _ `/ __/  '_/
   /__ / .__/\_,_/_/ /_/\_\   version 3.1.1
      /_/

Using Python version 3.9.2 (default, Feb 21 2021 05:02:46)
Spark context Web UI available at http://172.31.78.52:4040
Spark context available as 'sc' (master = local[*], app id = local-1617538002839).
SparkSession available as 'spark'.
And the test command returns the same dummy dataframe:
spark.createDataFrame([("Alex", 37), ("Ivan", 9)], ["first_name", "age"]).show()

# results into:

+----------+---+
|first_name|age|
+----------+---+
|      Alex| 37|
|      Ivan|  9|
+----------+---+
Step 5 – Working with delta lake
The functionality of delta lake requires extra packages to be referenced during the startup of the framework. The pyspark shell example is:
pyspark --packages io.delta:delta-core_2.12:0.8.0 --conf "spark.sql.extensions=io.delta.sql.DeltaSparkSessionExtension" --conf "spark.sql.catalog.spark_catalog=org.apache.spark.sql.delta.catalog.DeltaCatalog"
And this is the way to generate the spark context:
spark = pyspark.sql.SparkSession.builder.appName("MyApp") \
    .config("spark.jars.packages", "io.delta:delta-core_2.12:0.8.0") \
    .config("spark.sql.extensions", "io.delta.sql.DeltaSparkSessionExtension") \
    .config("spark.sql.catalog.spark_catalog", "org.apache.spark.sql.delta.catalog.DeltaCatalog") \
    .getOrCreate()

from delta.tables import *
During the first start missing packages will be downloaded and stored in the cache folder:
---------------------------------------------------------------------
|                  |            modules            ||   artifacts   |
|       conf       | number| search|dwnlded|evicted|| number|dwnlded|
---------------------------------------------------------------------
|      default     |   8   |   8   |   8   |   0   ||   8   |   8   |
---------------------------------------------------------------------
8 artifacts copied, 0 already retrieved (15304kB/43ms)
Let’s create a dummy dataframe data and save it as the delta table:
data = spark.range(0, 5)
data.write.format("delta").save("data/delta-table")
exit()
The quick inspection of the specified path shows that _delta_log and set of parquet files created:
ls data/delta-table/

# results to:
_delta_log
part-00000-4dff4d26-dd83-4e6f-9922-8dae8dbec40c-c000.snappy.parquet
part-00001-cca8f163-c6cd-445c-a725-933e438f6d9a-c000.snappy.parquet
part-00003-7c0be18e-3289-4a13-834f-2f7e466462ed-c000.snappy.parquet
part-00004-2d44295a-6589-4b04-a793-ee2074fd1aae-c000.snappy.parquet
part-00006-df4e07f8-fda5-4b85-b045-95659a918f3b-c000.snappy.parquet
part-00007-bcfc48a4-4d2c-4bef-b630-dfbc1583b76e-c000.snappy.parquet
Step 6 – The shutdown of the environment
Perhaps the easiest step today. When we are done, we can release resources by deactivating the conda environment and stopping WSL subsystem:
# run in bash:
conda deactivate

# run in Windows 10 shell:
wsl --shutdown
That was it. I hope this post full of the bash commands is helpful to get started with conda environments and have a clean setup. Have fun! 🙂