Azure DevOps for SQL Server DBAs. Part 1 – Creating a Database Project
Azure DevOps as the tool and DevOps as the culture are hot topics these days. Traditionally, such methodology and related tools are heavily in use by developers. However, the tooling can also be helpful for operational roles, like SQL Server DBA. In a coming series of posts, I will do my best to show how DBA teams can benefit from Git repositories, deployment pipelines and continuous delivery of database objects like maintenance stored procedures, and SQL Server Agent jobs.
So, why are Git and versioned database projects needed for DBAs?
SQL Server DBA teams have to manage dozens, sometimes hundreds or even thousands of SQL Server instances. Often these instances are built in an automated way. They have the same set of disk drives, the same layout of folders, the same set of SQL Agent jobs, and often maintained using the same maintenance logic, so tables, stored procedures, etc.
The maintenance logic can consist of in-house and third-party code. Think of Ola Hallengren backup procedures, Brent Ozar first responder kit best practices checkers, sp_WhoIsActive of Adam Machanic, and so on. Some shops place such code to master or msdb system databases, however, such an approach is not supported everywhere. Another, and in my opinion safer way is to keep DBA’s objects in a separate database, for instance [dba] or [dbadb]. Further in this post, I will focus on a second approach: a specialized dbadb that exists on every managed database instance and acts as the container for DBAs assets.
So why source control? Naturally, at some point, the database [dbadb] must be updated. For instance, you have a new business requirement and want to update on all instances a stored procedure that checks for the existence of some login; another example, a new version of First Responder Kit released and you want to push it to all database instances; another example is a mere bug fixing – one of your colleagues found a bug in a frequently running job and patch should be pushed everywhere and soon.
If all maintained servers can be counted by fingers of one hand, the updates still can be deployed manually using SSMS. However, even in this case, there are drawbacks:
- Sometimes not all instances receive an update consistently due to human mistakes
- You do not know who updated the code and when
- The database objects are overwritten in [dbadb] and there is no maintained history, nor previous versions
Therefore, 2020 is a good year to think about DevOps practices and tools like Azure DevOps or GitHub, deployment pipelines, and Git as a source of the truth for your code and all related changes in it. In a such case, the source code is controlled by Git. When the team is ready to push changes to managed targets, it creates a release branch. Such a branch triggers the deployment pipeline, which compiles a set of SQL scripts into the DacPac and pushes it to the destination SQL Server instances.
While It can sound complicated, visually, the workflow illustrated this way:

Such an approach brings the following benefits:
- Source code stored in Git means out of the box code versioning, history, rollbacks, lightweight branches
- Quality gates: Pull requests, four-eye approval policies, static code analysis using SonarQube, etc
- Consistent deployments, so, no human factor, each team member can trigger deployment pipeline and the deployment will pushes changes the same way
- Free, lightweight, and cross-platform tools like Azure Data Studio and Visual Studio Code have a native Azure DevOps and GitHub integration
This blog post is about the very first step of a staircase: get a database project created. We will place the stored procedure for further distribution. And finally, we will commit it to the source control. Let’s start by setting up the tooling that is needed for this journey.
Prerequisites
- Active Azure DevOps project. It will be used through the series of the coming posts as the container for the source code and deployment pipelines.
Getting ready with tools
The very first choice to make is the IDE which will be used to build a database project. In the past, the default choice was SSDT which was based on a free (shell) version of Visual Studio. However, since the release of Visual Studio 2019, there is no more such option for commercial use. If the development team wants to use SSDT based on Visual Studio 2019 it should buy a Professional or Enterprise license for every developer.
However, there is an alternative! The cross-platform and free Azure Data Studio (ADS) supports database projects starting the 2020 September release. Therefore, I will proceed with this tool. If you want to practice with database projects and already have ADS installed, please make sure that it is at least 2020 September’s release.
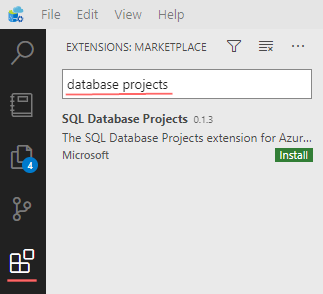
Just like Visual Studio Code, the Azure Data Studio also supports extensions and one will be needed. To get it installed, open an Extension tab and search for “database projects”, and install the “SQL Database Project”. This action will also install “SQL Server Schema Compare”.
Worth to mention that building of dacpacs in ADS requires .NET Core SDK. If it is not yet on your machine, or it is corrupted, the build process terminates with an error:
[ Build ]
> "C:\\Program Files\\dotnet\\dotnet.exe"  build "c:\\repos\\dba-db\\dba-db.sqlproj" /p:NetCoreBuild=true /p:NETCoreTargetsPath="c:\\Users\\Alex\\.azuredatastudio\\extensions\\microsoft.sql-database-projects-0.1.3\\BuildDirectory"

stderr:   It was not possible to find any installed .NET Core SDKs
stderr:   Did you mean to run .NET Core SDK commands? Install a .NET Core SDK from:
stderr:       https://aka.ms/dotnet-download
The fresh version of .NET Core SDK can be obtained from https://aka.ms/dotnet-download
Recently I received a feedback that Microsoft still allows to use VS2019 Community Edition together with database development tools in corporate environments
Any number of your users may use the software only for Microsoft SQL Server development when using the SQL Server Data Tools or the extensions “Microsoft Analysis Services Projects”, “Microsoft Reporting Services Projects”, or “SQL Server Integration Services Projects” to develop Microsoft SQL Server database projects or Analysis Services, Reporting Services, Power BI Report Server, or Integration Services projects (link).
Thomas Totter, thanks for bringing this up.
Create a Database Project
Step 1. Clone repository
The very first step is to create if needed and then clone an empty repository to a local folder. In my case, it is C:\repos\dba-db
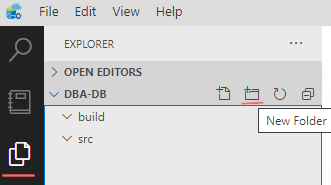
Step 2. Create folder structure in a repository
In Azure Data Studio choose in the menu: File -> Open Folder, then choose a folder which was used to clone a repo, so C:\repos\dba-db.
Then, using an Explorer tab create two sub-folders:
- build – this sub-folder will be used later for placing yaml pipelines
- src – for database project
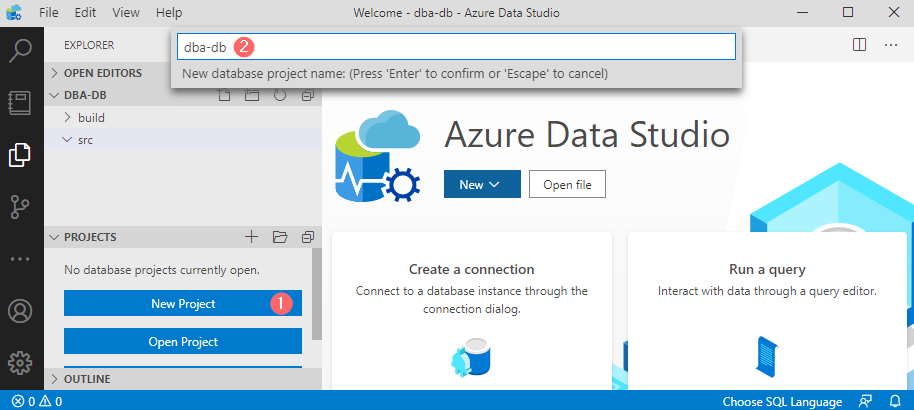
Step 3. Create a database project
- Open the “Explorer” tab and in section Projects click on “New Project”
- Enter a new project name. In my case, it is “dba-db”
- Then choose the recently created src directory as the project folder
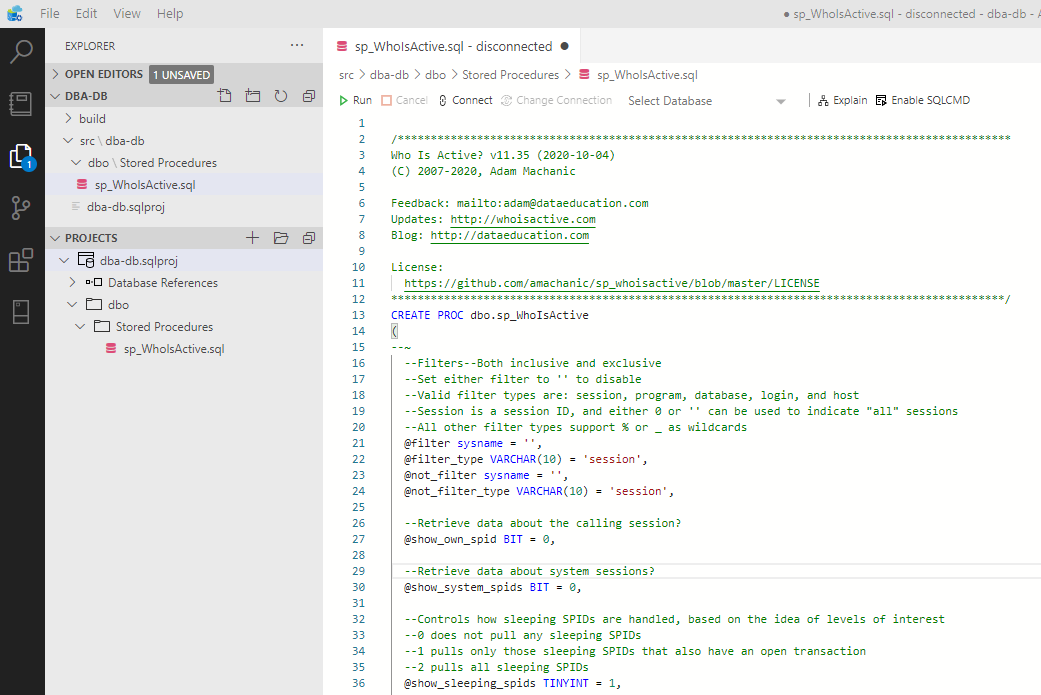
Step 4. Place first object – procedure sp_WhoIsActive
- By right-clicking on the database project, choose the item “New Folder” and create two nested directories: dbo->Stored Procedures.
- Create a new dummy stored procedure with the name “sp_WhoIsActive”. Azure Data Studio will create an object with templated text:
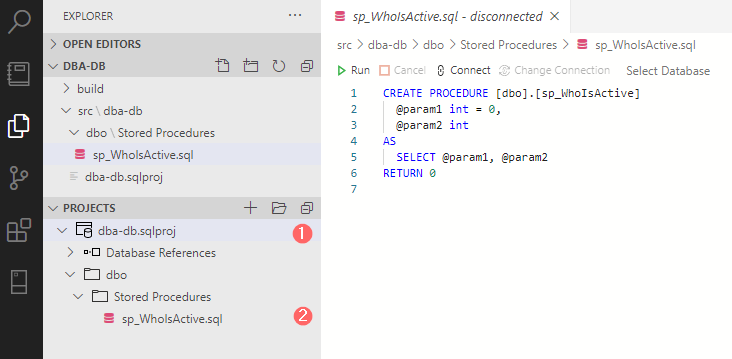
3. Place Adam’s Machanic procedure sp_WhoIsActive by getting the current version from his GitHub repo: amachanic/sp_whoisactive. Then, save all files.
Step 5. Building the project
Build a project by right-clicking on it and choosing “Build”. If the .NET Core SDK is installed, the build process will be started promptly. In my case, even if it was finished successfully, it still generated 110 warnings and they all are related to unresolved reference to system objects:
stdout: c:\repos\dba-db\src\dba-db\dbo\Stored Procedures\sp_WhoIsActive.sql(1658,20,1658,20): Build warning SQL71502: SqlProcedure: [dbo].[sp_WhoIsActive] contains an unresolved reference to an object. Either the object does not exist or the reference is ambiguous because it could refer to any of the following objects: [sys].[sysprocesses].[sp]::[spid] or [sys].[sysprocesses].[spid]. [c:\repos\dba-db\src\dba-db\dba-db.sqlproj]

stdout: c:\repos\dba-db\src\dba-db\dbo\Stored Procedures\sp_WhoIsActive.sql(1342,26,1342,26): Build warning SQL71502: SqlProcedure: [dbo].[sp_WhoIsActive] contains an unresolved reference to an object. Either the object does not exist or the reference is ambiguous because it could refer to any of the following objects: [sys].[dm_exec_requests].[sp]::[request_id], [sys].[sysprocesses].[request_id] or [sys].[sysprocesses].[sp]::[request_id]. [c:\repos\dba-db\src\dba-db\dba-db.sqlproj]

stdout:     110 Warning(s)
stdout:     0 Error(s)
Normally, database project warnings and errors are important signals that something is not going well with a project compilation. However, the warnings above are caused by references to system objects, which is normal, since sp_WhoIsActive queries them by design. The issue can be partially resolved by creating a new Database Reference that points to the master. However, then it will just reduce the number of messages from 110 to 30. The alternative way is to fully disable these warnings for sp_WhoIsActive.
For that, right click on the project and choose “Edit .sqlproj File”. Internally project file is a XML file. Locate tag “Build” with an attribue sp_WhoIsActive:
<ItemGroup>
    <Build Include="dbo\Stored Procedures\sp_WhoIsActive.sql"/>
</ItemGroup>
and then add an additional element “SuppressTSqlWarnings”:
<ItemGroup>
  <Build Include="dbo\Stored Procedures\sp_WhoIsActive.sql">
      <SuppressTSqlWarnings>71502</SuppressTSqlWarnings>
  </Build>
</ItemGroup>
Save changes in the .sqlproj file and build the project again. This time build finishes with a clean log:
stdout:   Building the project model and resolving object interdependencies...
stdout:   Validating the project model...
stdout:   Writing model to c:\repos\dba-db\src\dba-db\obj\Debug\Model.xml...
stdout:   dba-db -> c:\repos\dba-db\src\dba-db\bin\Debug\dba-db.dll
stdout:   dba-db -> c:\repos\dba-db\src\dba-db\bin\Debug\dba-db.dacpac
stdout:
stdout: Build succeeded.
stdout:     0 Warning(s)
stdout:     0 Error(s)
The build generates a DacPac file. Let’s talk next about this artifact.
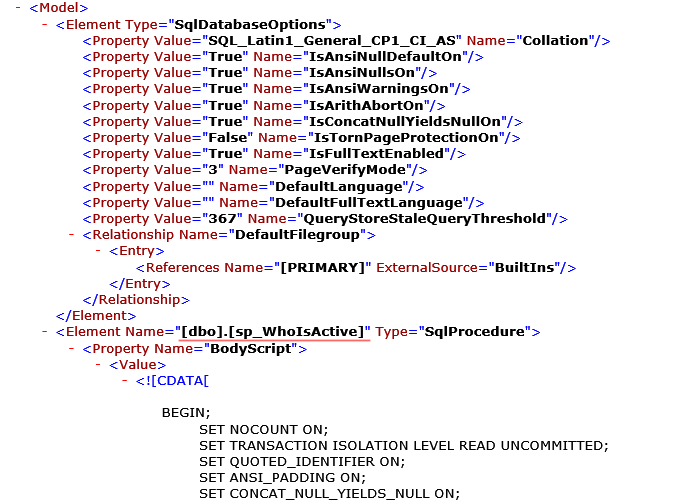
What is inside a dacpac?
The DacPac infernally is a zip archive which contains a few XML files:

It acts as the compiled data model and does not contain the data in the form of rows and columns. Instead, it keeps DDL scripts of all objects. They are merged into a model.xml, which looks this way:
When the deployment is started, this process compares the dacpac model with a state of destination database and generates necessary DDL commands only to sync the target database to the desired state.
Let’s test that and kick an initial deployment manually. For this, right-click on the database project and choose the option “Publish”. This will open a Publish project wizard where a database connection to be selected:

When the destination instance name and credentials are filled, click on the button “Publish”. If everything went well, Azure Data Studio shows that the deployment task is finished:

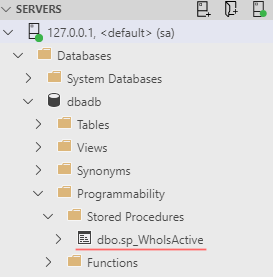
And the final check shows that the stored procedure was deployed to the database instance:
Within this post, we will publish only this single, famous, and helpful stored procedure. However, the sky is the limit for the ideas of what can also be added there.
Initial source control commit
We are done with a database project for now and ready to commit changes to the Git repo.
Step 1. Place a recent .gitignore into the repo
For this, download https://raw.githubusercontent.com/github/gitignore/master/VisualStudio.gitignore, rename it to .gitignore, and place into the root folder. This file is needed to prevent tracking binary build artifacts by Git.
Step 2. Create a commit
Open a “Source Control” tab and then:
- Enter a commit label
- Stage all pending changes by clicking + in “Changes” list
- Click on “Commit”

Step 3. push the commit to the origin repository
The final part is to push a local commit to the remote repo. There are a few ways to do this. For instance, via the source control menu choose the option “Push”. Alternatively, the bottom left corner has the number of incoming/outgoing commit to synchronize. By clicking on it, the Git will first pull then push all local changes:

As the result, the remote Git repo should contain all changes we performed recently.
Final words
Within this post, we have done quite a lot. We get Azure Data Studio prepared for database projects and created a blank one. Added a third-party stored procedure that we want to distribute among SQL Server instances. Tested the DacPac package by running a manual deployment.
The last task – the DacPac deployment is to be further automated. For this, we will create a specialized deployment pipeline. However, it will be the primary subject of the next blog post. Stay tuned!