Azure Data Factory & DevOps – Integration with a Source Control
A few recently published posts – Automated Deployment via Azure CLI and Post-Deployment Configuration via Azure CLI are about getting blank environments deployed and configured automatically and consistently. It is time now to integrate a development stage with Azure DevOps. In this post, I will make a step by step guide of how to add a Data Factory instance to a source control system. The next one will cover more Continuous Integration and Continuous Delivery or CI/CD.
Prerequisites
- Blank development, test and production environments. They can be generated and configured by using scripts from those previous two posts. So the whole landscape will eventually have a look similar to:

Why bother with source control and Azure DevOps?
The Data Factory currently supports two editing modes: Live and GIT integrated. While LIVE editing is an easy start and available by default, the other alternative has various advantages:
- Source Control Integration and CI/CD:
- Ability to track/audit changes.
- Ability to revert changes that introduced bugs.
- Release pipelines with automatic triggers as soon as changes published to a development stage.
- Partial Saves:
- With Git integration, you can continue saving your changes incrementally, and publish to the factory only when you are ready. Git acts as a staging place for your work.
- Collaboration and Control:
- A code review process.
- Only certain people in the team allowed to “Publish” the changes to the factory and trigger an automated delivery to test / production
- Showing diffs:
- shows all resources/entities that got modified/added/deleted since the last time you published to your factory.
Some words of warning: the discussed topic is quite complex and the whole source control and CI/CD theme would be hard to cover in just one post. Therefore it will come as a split into two parts. The current one will cover only a GIT integration. The next post will illustrate the remaining part. Therefore only a highlighted part of the flow will be covered now:

Step 1. Configuring a Source Control
The very first step is to connect make a source control account and connect it with a Data Factory.
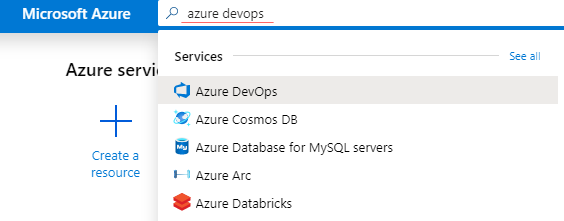
Step 1.1: Create Azure DevOps Organization account
Enter a keyword “azure devops” in the Azure Portal search field and open a service creation page:
On Azure DevOps page click on “My Azure DevOps Organizations”:
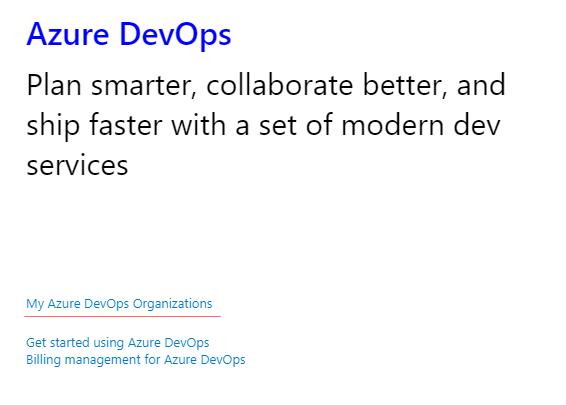
This action will bring to a separate DevOps portal: aex.dev.azure.com, where all existing organizations listed or a new one can be created:
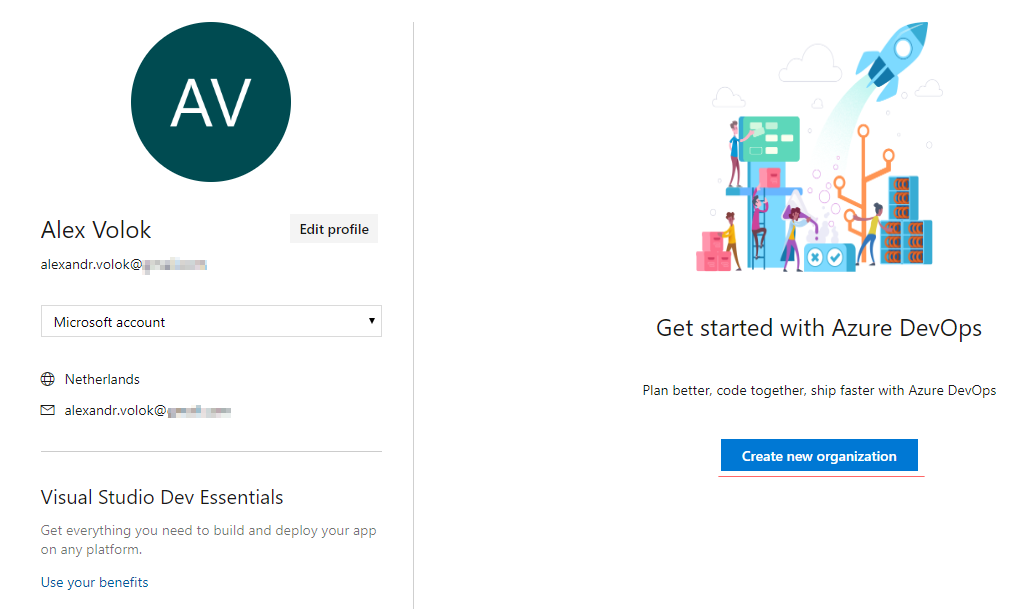
Because I have no organization created yet, a brand new one has to be submitted by entering a name and a preferred location:

Step 1.2: Create a blank project
The DevOps Organization is conceptually very similar to a TFS Project Collection. It acts as an administrative container for one or more projects. Therefore, the next logical step is to define a project within a new organization:
- Add a meaningful name of the project
- Choose visibility: Private

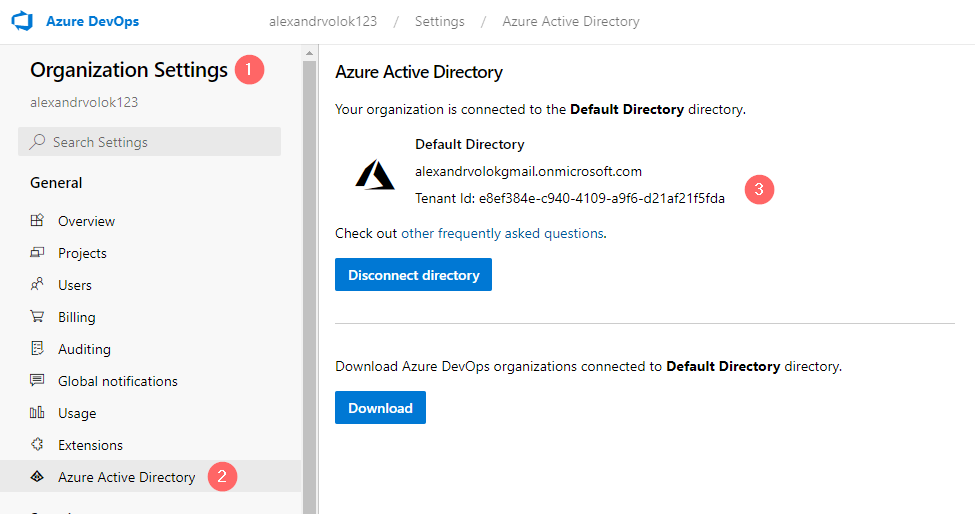
Step 1.3: Azure Active Directory Integration
Important: Make sure that recently created DevOps Organization is connected to the same Active Directory as a Data Factory. Otherwise, Data Factory will not display it in a source control configuration wizard.
The linkage can be checked by opening Organization Settings and checking Azure Active Directory settings:
Step 2. Set up code repository in Data Factory
The next logical step is to configure a GIT integration. This must be performed only in a development environment because the test and production stages will be maintained by a Continuous Delivery logic.
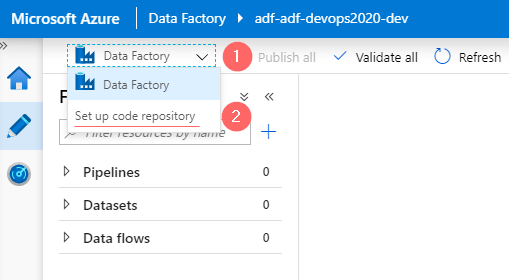
Step 2.1. Initiate a code repository wizard
In a top-left drop-down choose a “Set up code repository” option. This will open a “Repository settings” form on a right pane:
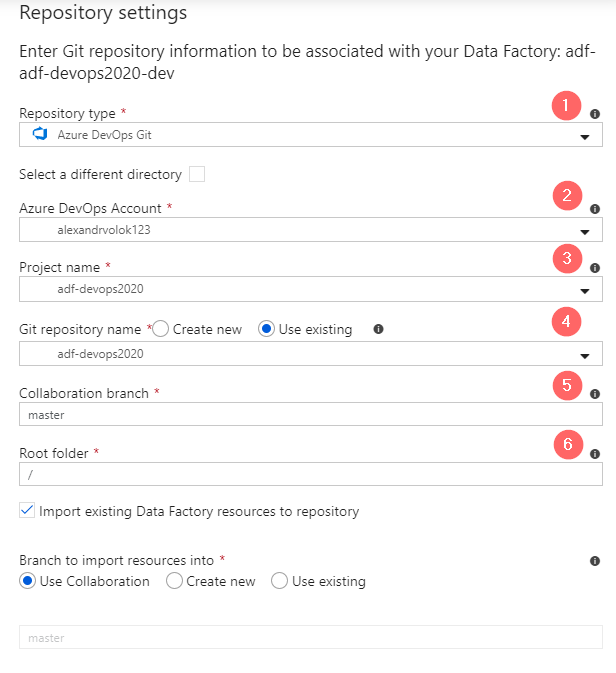
Step 2.2: Configure code repository integration
- Choose a repository type: Azure DevOps (1)
- Select an organizational or DevOps account (2)
- Chose a project that was created in a previous step (3)
- Choose “Use existing” Git repository (4)
- Leave a default “master” as a collaboration branch and root folder (5, 6)
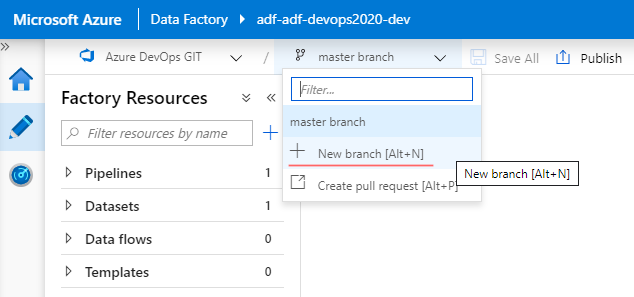
Step 2.3: Create a new branch
Because GIT integration is enabled, there is a new drop-down control to choose which branch has to be used by UI. As a best practice, Microsoft recommends making adjustments in a separate isolated branch. Let’s create such a new branch. For this, click on “+ New branch” and then provide some meaningful name. In my case, it is: “alexvolok_add_activity”, because I am going to add a very first ADF activity to a blank data factory canvas
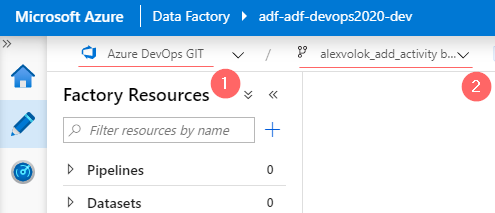
When the new branch is created, the editor switches to it automatically.
Step 3. Apply a dummy changes to a data factory
In this step I will execute a dummy development task: create a new linked service and add Get Metadata activity that enumerates child items of a storage container.
Step 3.1. Create a Linked Service for a Data Lake
First things first, lets firstly define a data lake linked service. The account key is stored in a Key Vault that belongs to a development environment so it will be used during the linked service configuration.
- Give a name to linked service (1)
- Leave a default authentication method: Account Key (2)
- Account Selection: Choose “Enter Manually” and copy/paste a “Primary ADLS file system endpoint”. It can be found in properties of a storage account (3)
- Add a Key Vault instance that belongs to a development environment (4)
- Type manually the name of the secret that holds a storage account key. In my case, it is AzStorageKey (5)
- Test a connection (6) and if “Connection successful” pop-ups click on “Create” (7)

Step 3.2. Create a pipeline and add a dummy activity
Let’s create a dummy pipeline and activity which will perform a basic enumeration of files in a storage account:
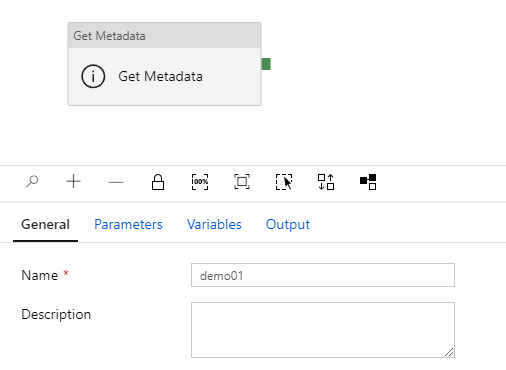
- Create a new pipeline and name it “demo01”
- Add an activity “Get Metadata”
- Open a tab “Dataset” and click on “+ New”
- Choose type: “Azure Data Lake Storage gen2”
- Choose a format: Binary
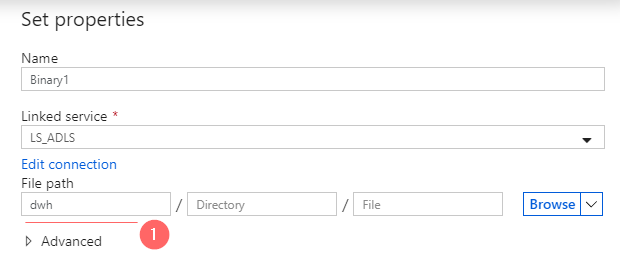
- In a Set properties window:
- Choose a storage account linked service that was created in a previous step
- Type “dwh” in the name of the storage container
- Click OK to create a data set
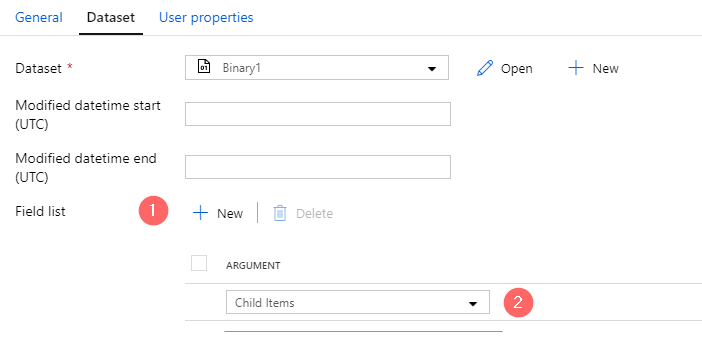
- In Field list click on “+ New”
- Choose Child Items. Such a setting will return a JSON based enumeration of all children objects of a “dwh” container
Step 3.3. Test a pipeline
- Click on Debug button and wait when the pipeline execution is over
- Click on the output of a Get Metadata activity. It should show an array
childItems:

Step 4. Merge a branch that contains changes into Master
Step 4.1 Create a pull request
Using a branch drop-down menu, select an option “Create pull request”:

Add a title and description to a pull request:

Step 4.2 Approve a pull request and complete merge
To a code review pull request, click on Approve:

Info: Because my account is the owner of a current DevOps project, I can also approve or even directly complete a merge into master. In other circumstances, when there are multiple team members, the code review and merge process will be a role dependent. It can be that I will not have permission to approve, therefore another team member after a code review has to do it and then person with appropriate permissions to perform a final merge.
The final action, merge the branch into master:

A confirmation message that the merge is done:
Step 4.3 A source control check
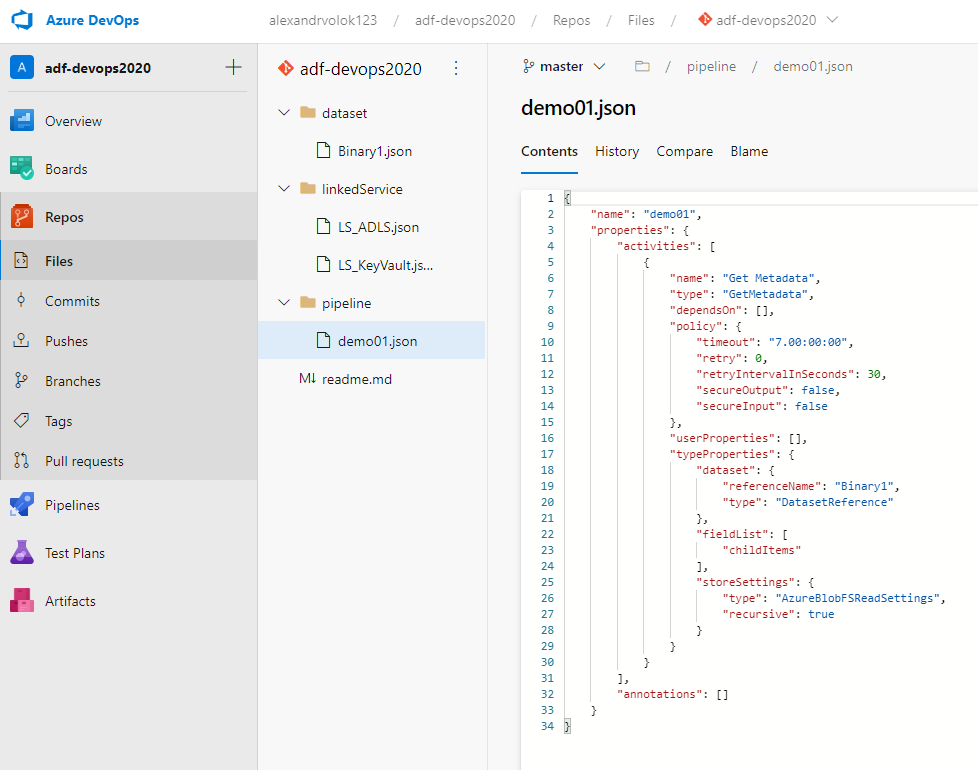
By completing a merge of the last changes into a master branch I can observe recently added objects, like linked services LS_ADSL, LS_KeyVault, a pipeline demo01.json and so on.
Another side effect of ADF GIT integration is that by default a work branch will be removed right after a merge operation. The UI prompts that my custom working branch does not exist anymore and propose to switch to master:

Step 5. Publish Data Factory to a Development stage
When necessary change requirements are implemented, reviewed by peers and merged into the master branch it is a time to deploy the source code to a development stage. It can be done by hitting a “Publish button:

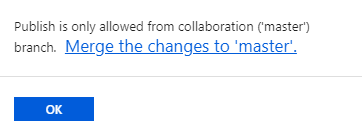
Warning: it is possible only by using a collaboration branch. If publish triggered accidentally from some other branch it will be interrupted with a pop-up message:
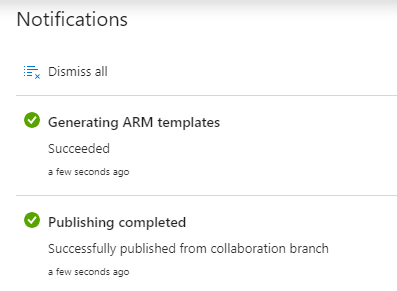
When the publishing process is over it notifies that about two successful actions:
- The ADF environment received the newest code from a collaboration branch
- The ARM template was successfully generated.
The brief check of Azure Repos confirms – a new branch adf_publish created and placed side by side to a master.
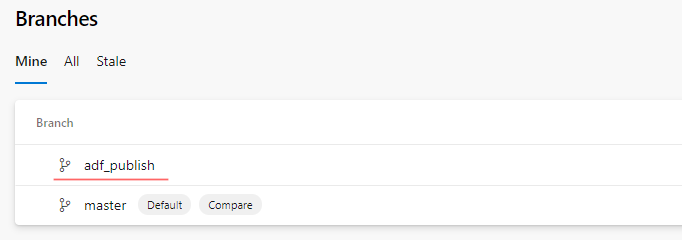
In a coming blog post, I will touch this branch in a more detailed way since it plays a crucial role in CI/CD logic. For now, it is important to remember that it refreshes every time when changes are published to a data factory and the content of this branch is different from the content of the master.
Final words
This is a third post in a series of Azure Data Factory and DevOps. It illustrates in a detailed step-by-step way a simpleness of integration of Data Factories into source control and shows some of the possibilities which it opens for development teams. In the next post, I show a final topic of the series: Setting-up CI/CD Pipeline.
Many thanks for reading.